How I Made $2,000,000 In The Stock Market

In Just 18 Months, Nicolas Darvas Turned $25,000 into Over $2 Million...
This is How He Did It...

Forex E75 System to make you rich ?

What Will Users of the E75 Forex Release 2+ Trading System Be Able to Learn From This Course? Firstly, users will learn about the importance of compounding and money management

Organic Fruit Growing

Go to Blogger edit html and find these sentences.Now replace these sentences with your own descriptions.This theme is Bloggerized by Lasantha Bandara - Premiumbloggertemplates.com.

How to Do Everything with JavaScript

This friendly, solutions-oriented guide is filled with step-by-step examples that illustrate how to write basic to advanced JavaScript applications, as well as modify existing scripts to suit individual needs.

How To Choose a Laptop

Buying and using a laptop can be a liberating experience. You will have the ability to take your work wherever you go, take your computer to class, a coffee shop, on a trip - anywhere. You may end up spending a bit more for a laptop than you would ...

Web Hosting

Tuesday, December 30, 2008

How to Make an Origami Reindeer

This origami reindeer is a simple design, and can be attempted by a paper folder of any level. It's great for using up unwanted murky brown origami paper, and it can make for a creative Christmas decoration!
STEPS :

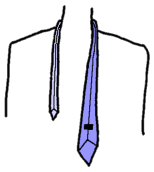
  1. Start with a square sheet of paper.
  2. Fold it across one diagonal.
  3. Unfold it again.
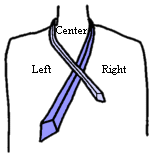
  4. Fold one side of the square to meet the line made by the diagonal fold.
  5. Repeat this for the adjacent side of the square.
  6. Repeat the previous two steps for the remaining sides of the square without unfolding anything.
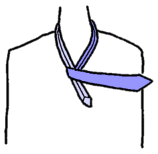
  7. Fold it in half, from point to point, as shown, and then unfold it.
  8. Put your finger in one of the flaps.
  9. Pull out the point, using the previous fold as a template, and press it down.
  10. Repeat the previous two steps for the other flap.
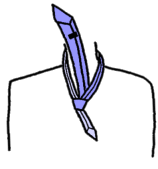
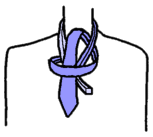
  11. Fold it in half along its length as shown.
  12. Pull the point that the flaps point towards back into the middle in a reverse fold. Flatten it down to construct the neck.
  13. Fold both of the flaps back as shown. These are your reindeer's front legs.
  14. Make a reverse fold at the top of the neck, beginning the formation of the head.
  15. Unfold the head as shown.
  16. Fold the point underneath to make the nose more flat.
  17. Fold the top of the head in half over to the opposite side as shown.
  18. Make a reverse fold and flatten as shown to create the beginnings of the hind legs.
  19. Make another reverse fold about half way down the hind legs and flatten it to see the fully formed hind legs.
  20. Cut up the back of the neck as shown, without actually completely cutting off any part of the reindeer.
  21. Split the middle of this flap right up the back of the reindeer's neck. You'll end up with four little prongs.
  22. Fold the prongs upwards to form antlers and complete the reindeer.
AddThis Feed Button
Bookmark and Share

Wednesday, December 24, 2008

15 Great and Easy Ways to Lose Weight Fast

Here are 15 great ways to lose weight fast. So if you want to lose 10 pounds fast, just follow these easy diet tips. Start by paying attention to what you eat and be sure to have good tasting, fresh and healthy food including snacks, eat more vegetables to fill you up and eat fruit and in place of dessert. No need to make sacrifices! Just follow these simple guidelines to lose your first 10 pounds. These 15 weight-loss guidelines will give your weight-loss program a boost when it seems to have sputtered to a halt. This is a balanced and flexible plan that you can use for as long as you want.

1. Keep notes of everything that you eat and drink. You do not need to count calories. Just write down what you had and in the approximate quantity. Just the fact that you are aware of what you are eating helps you plan healthy meals and snacks.

2. Cut in half your intake of all fats. This means using half as much butter or spread on your bread, toast, muffins, and potatoes; use half the amount of mayonnaise or dressing on your salad; and half the oil when you use the frying pan.

3. Limit treats and desserts that contain sugar to three times per week. This includes chocolate, ice cream, desserts, cake, pastries, cookies, etc.

4. For most meals you should include a low-fat source of protein, for example: chicken, beans, fish, cottage cheese, or low-fat yogurt. On occasions, have eggs, nuts and red meat, but not every day.

5. Every week planned at least one lunch and dinner without meat or cheese. Instead, build those meals around whole-grain, vegetable and beans, which can increase fiber and reduced fat.

6. A great way to reduce fat in your overall diet is to reduce the fat content in your milk products. If you’re currently drinking whole milk, use 2% milk instead. If you currently drink 2% milk then reduce it to 1%. Choose lower fat cheese and yogurt. When you buy yogurt, also check that it does not contain sugar.

7. Have fruit at least two times a day. Fruit can be a great substitute for dessert or as a snack. It’s best to choose fruit that is in season.

8. Instead of drinking sodas, juices, milky drinks or alcohol, drink water instead. Always avoid diet soda - a sweet taste only encourages you to crave sugar. Hot water with a slice of lemon can be very refreshing in the morning.

9. Include at least two servings of vegetables at lunch and dinner. If you’re still hungry, have more.

10. Always eat slowly. The body can take as long as 20 minutes to register when you’re full and it is easy to eat too much if you are racing through your meals.

11. Grated carrots make a great snack. This may sound strange, but grated carrots are much more filling than whole carrots.

12. Whenever possible use whole grains. The fiber will give you a fuller feeling and will also help in digestion.

13. Choose foods that you can chew this will increase your fiber intake, and simply by the act of chewing will makes you feel more satisfied. For example, eating fruit instead of drinking juice and if you have soup make sure it’s chunky.

14. Always plan your meals and snacks ahead of time. This will help with the shopping also…make a list of what you need and stick to it. If you just grab something when you are feeling hungry, you will probably choose high calorie food.

15. Always switch off the TV when you eat. That includes snacks as well as meals. Studies have shown that we eat large portions while we eat in front the TV, probably because we’re much less aware of what we are eating. When you eat, only eat if you want to lose weight fast.

For more information about weight loss and weight loss help, visit: http://www.ColumbineOrganics.com

AddThis Feed Button
Bookmark and Share

Tuesday, December 23, 2008

How to Tie an Oriental Knot

Instructions for Tying an Oriental Knot

The instructions for tying an Oriental knot are shown below. We assume that you are right-handed in the following instructions. The figures below are mirror images. They are what you will see if you stand in front of a mirror.

1. At the beginning, the wide end of the tie should be on your right side and the other end should be on your left side. Note that the tie should begin inside out.


2. Cross the narrow end over the other end. Now three regions are formed (Left, Right and Center).


3. Bring the wide end over the narrow end from the Left region to the Right region.


4. Bring the wide end under the narrow part of the tie to the Center region.


5. Bring the wide end down and pass the loop in front. Ensure that the knot is tightened.


6. Use one hand to pull the narrow end down gently and use the other hand to move the knot up until it reaches the center of the collar.


AddThis Feed Button
Bookmark and Share

Sunday, December 21, 2008

How To Write Resume in English

Writing a resume in English can be very different than in your native tongue. The following how to outlines a standard resume format.

Here's How:
  1. First, take notes on your work experience - both paid and unpaid, full time and part time. Write down your responsibilities, job title and company information. Include everything!
  2. Take notes on your education. Include degree or certificates, major or course emphasis, school names and courses relevant to career objectives.
  3. Take notes on other accomplishments. Include membership in organizations, military service and any other special accomplishments.
  4. From the notes, choose which skills are transferable (skills that are similar) to the job you are applying for - these are the most important points for your resume.
  5. Begin resume by writing your full name, address, telephone number, fax and email at the top of the resume.
  6. Write an objective. The objective is a short sentence describing what type of work you hope to obtain.
  7. Begin work experience with your most recent job. Include the company specifics and your responsibilities - focus on the skills you have identified as transferable.
  8. Continue to list all of your work experience job by job progressing backwards in time. Remember to focus on skills that are transferable.
  9. Summarize your education, including important facts (degree type, specific courses studied) that are applicable to the job you are applying for.
  10. Include other relevant information such as languages spoken, computer programming knowledge etc. under the heading: Additional Skills
  11. Finish with the phrase: REFERENCES Available upon request
  12. Your entire resume should ideally not be any longer than one page. If you have had a number of years of experience specific to the job you are applying for, two pages are also acceptable.
  13. Spacing: ADDRESS (center of page in bold) OBJECTIVE double space EXPERIENCE double space EDUCATION double space ADDITIONAL SKILLS double space REFERENCES. Left align everything except name/address.
Tips:
  • Use dynamic action verbs such as: accomplished, collaborated, encouraged, established, facilitated, founded, managed, etc.
  • Do NOT use the subject "I", use tenses in the past. Except for your present job. Example: Conducted routine inspections of on site equipment.

  • AddThis Feed Button
    Bookmark and Share

    Saturday, December 20, 2008

    How To Solve Sudoku

    This guide will show you how to solve sudoku puzzles in three steps.

    Sudoku puzzles can be intimidating and difficult to solve, but with a proper strategy, focusing on elimination, you can finish a Sudoku puzzle in mere minutes.

    The first step to solving Sudoku puzzles is to try and assign numbers to cells using the 9 big squares. Every number between 1 and 9 must appear once in every big square. There is no real “proper” spot to start a Sudoku puzzle; it is all really up to you. Personally, I like to begin with the centre row. Consider the centre row of the following puzzle (which has been rated at a difficulty of medium):

    sudoku how to 1
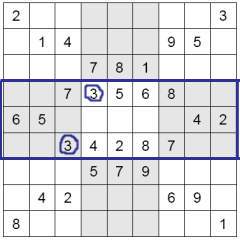
There are two threes in the first two squares. However, there is no three in the last square. Upon further inspection, it can be determined that since the two 3s are in two different rows, it leaves only the empty box in the middle row for the final 3 to fit. If the 3 is placed in any of the other empty cells, there ends up being two 3s in one of the rows. Once you have started, it is not uncommon for a large chain reaction to begin. Using this method you will often be able to solve at least ¼ of a puzzle just with this one step! It’s also quite common for all one number to be found all nine times required, just in this step. Using this method, complete any possible cells in the puzzle.

    (In future diagrams, numbers determined using this method will be coloured in blue.)

    he next step involves looking at each of the nine individual squares, and to try and find as many numbers as possible knowing that every number between 1 and 9 can only appear once in every square. After step one, you should have at least one or two squares with only a couple (perhaps two or three) empty cells remaining. It is most definitely worth trying to see if any, and perhaps even all of these squares could somehow be filled in. To do this, I find it is easiest to begin with the box containing the fewest number of empty cells. In our example, after step one, the following numbers are found in the leftmost square of the middle row:

    4, 2, 7, 6, 5, 8, 3

    There are only two cells in this square that do not yet have numbers assigned to them. The numbers missing are 1 and 9. This means one of the two cells will definitely contain a 1, and whichever one remains will contain the 9.

    sudoku how to 2
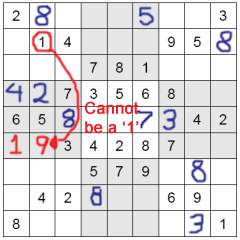
Now to figure out which number goes into which slot. The empty cells are both in the same row, so looking at the numbers in the row do not help us. We are going to solve this by looking at the numbers in the columns in which each cell is located. The column of the first empty cell contains only a 2, a 4, a 6 and an 8. This information cannot help us solve the puzzle, as we need either a 1 or a 9 in either column. The column of the second cell, however, contains an 8, a 1, a 2, a 5 and a 4. Since there is a 1 in this column, the empty cell we are looking at cannot contain a 1, as that would make two 1s in a single column. This means the 9 must fit in that cell, and the 1 fits into the cell next to it. That puzzle is now solved! Here is a diagram displaying the method used to solve this square.


    Continue with this method until you have added as many numbers as you can into squares. This step is extremely useful, and, like the previous step, begins a chain reaction. You are most definitely encouraged to use the numbers you have already solved in this step to continue the step. Once this step is completed, the majority of the puzzle should be finished. In fact, if you are lucky and have a good eye, certain puzzles can be finished at the end of this step. In future diagrams, numbers assigned using this method will be coloured in red.

    sudoku how to 3
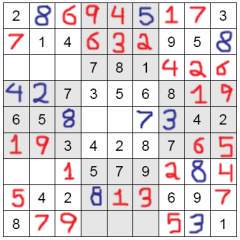
The final step is by very far the easiest, as there should, by now, be almost nothing of the puzzle left to complete. The example puzzle could be completed in step 2, as was mentioned above, but I specifically left certain cells blank in order to be able to demonstrate step 3. Here is how our puzzle looks:

    As you can tell, it is nearly completed. We are now going to complete the puzzle by filling in the individual rows and columns. Every number between 1 and 9 must fit into each row or column once. Knowing this, we are going to solve the remainder by the process of elimination. Consider the column the furthest to the left. There are two cells remaining, into which the numbers 3 and 9 must fit. The row in which the bottom cell is contains a 9. This means the three must fit into this cell, and the 9 into the top cell. Now we have solved a column!

    sudoku how to 4Use this method to complete the puzzle. Once you are finished, you should have something that looks like this:

    Congratulations, you have successfully solved a Sudoku puzzle!

    Are you a webmaster?

    You can get our sudoku puzzles on your website » Get the Free Sudoku Script here!


    AddThis Feed Button
    Bookmark and Share

    Friday, December 19, 2008

    6 secrets to solving puppy problems

    Shelby Marlo, who trains celebs' dogs, shares her tips for better behavior


    It's easy to fall in love with a puppy, but it's hard to make your precious pooch behave — unless you have the proper training. That's where Shelby Marlo comes in. She is a professional dog trainer to the stars, and her Hollywood clients have included Steven Spielberg, Tom Hanks and Paris Hilton. She is also the author of the award-winning dog training book: "The New Art of Dog Training: Balancing Love and Disclipline."

    Marlo was invited on TODAY to show us how she helped two of the show's staff members with their puppy problems, by using dog training tips we can all learn. Here they are:

    Puppy Training 101

    1. Use meal time as training. Reward good behavior and enforce basic commands with treats. Eventually you will not need to use food to get the dog to listen.
    2. Keep the dog on the leash, even in the house. The dog may walk around with it, but if you have a leash and collar on him, you have better control.
    3. Don't give up on the crate. It's not jail; it's centering for the dog, and a wonderful training device. Dogs typically don't want to soil their bed, and puppies should take naps and sleep in the crate.
    4. It's never too early to train your puppy. Training often starts as early as seven weeks. You have to constantly train your dog.
    5. The most important tool: communication. Most dogs think their name is "No," so you have to teach them a new vocabulary. Use basic commands, such as "off!" (if he's touching something or eating something he shouldn't) and "come," "sit," "stay, and "down."
    6. You need to develop a relationship with the dog. The dog is happier with rules and guidance.
    For more information on training your puppy, or dog, check out Marlo's Web site at www.ShelbyMarlo.com.

    AddThis Feed Button
    Bookmark and Share

    Saturday, December 13, 2008

    How to Connect to Another Computer Using Remote Access Software

    If you have Windows XP it has built in remote access software that helps you connect to a friends computer, by invitation, to help them by taking remote access control of their computer system. This means you could be in the USA and be helping your friend in Australia to find a solution to his or her computer problems. The technology to gain remote access to basically anyone"s computer is available on most computer users start menu. I regularly give my friends computer support from the comfort of my own home.

    What you need to use the Help and Support tool to gain remote access

    1. An broadband or cable internet connection.
    2. Windows Xp on both computers
    3. An email address or be signed into Windows 4. Live messenger.

    The easiest way to connect

    It is very easy to connect two computers over the internet. One computer can take control and fix problems on the other computer. Following these steps to use the Help and support software that is built in to Windows.

    1. Sign in to Windows Live Messenger and have your friend do the same thing.
    2. Go to the start menu and choose Help and Support (shown below) Just the computer user that wants to invite does this.
    3. The Help and Support Center will appear.
    4. Click on Invite a Friend to connect to your computer with Remote Assistance. Located under the Ask For Assistance menu.
    5. Then press Invite someone to help you. The window below will appear.
    6. Choose your friends name from the Windows Messenger contact list.
    7. Click on Invite this person.
    8. This will allow your friend to see your desktop. If they want to control your they must press the Take control button and the other person must agree by pressing ok..

    Check out the Screenshots for this article at How to connect to the another computer. This is what I see when I am in control of my friends computer...I can go on the internet or read their emails etc..

    Reasons to use Windows remote help and support

    --Your problem is so minor, you do not want to bother an IT support person.
    --You cannot afford an It technician, and your know a computer whiz..
    --You have already rang software support or your internet service provider and they could not help
    --You constantly need desktop computer help and using remote access software is easy!!

    Notes:
    --If you close the Remote Assistance Window it will disconnect. And you will have to start your remote access again if you want to connect.
    --Don"t worry if it is a bit slow because that is normal. The speed of your remote access depends on your speed of both internet connections.
    --You can also connect using an email address. The invitation is sent through email.

    AddThis Feed Button
    Bookmark and Share

    Friday, December 5, 2008

    Why read a book about getting a PhD?

    As a general rule, PhD students and their supervisors tend to focus
    primarily, or even exclusively, on the content of the research that will
    go into the doctoral thesis. Other issues are often taken for granted:
    how to organize your work, give a presentation, work in a team, cope
    with your supervisor, and how to effectively manage your time.When
    asked, former PhD students usually claim that the general experience
    of being a graduate student, which includes learning how to solve
    complex problems and work well with others, was of greater value to
    their careers than the actual topic of their thesis.
    The goal of this book is to help PhD students master some of the
    skills that have been proven effective in theworld outside of academia,
    and to help PhD students gain mastery over the non-scientific aspects
    of getting a PhD.Hopefully, this bookwill help graduate studentsmore
    fully enjoy their doctoral years, as well as provide somemuch-needed
    support as they prepare for their post-PhD careers.

    Code :
    http://www.megaupload.com/?d=E315F06P

    AddThis Feed Button
    Bookmark and Share

    Thursday, December 4, 2008

    Easy Way To Stop Smoking

    Allen Carr, "Easy Way To Stop Smoking"
    Penguin Books l PDF l 111 Pages l 350 KB

    Code:
    http://rapidshare.com/files/124049816/easy_way_to_stop_smoking.rar

    AddThis Feed Button
    Bookmark and Share

    Tuesday, December 2, 2008

    The Beginner's Guide to Real Estate Investing

    by Gary W. Eldred

    ISBN-10 / ASIN: 047164711X
    ISBN-13 / EAN: 9780471647119
    Publisher: Wiley
    Number Of Pages: 312
    Publication Date: 2004-04-09

    Everything you need to know to begin acquiring properties--now! No matter what obstacles you think you face, real estate still offers you multiple money making opportunities. In The Beginner's Guide to Real Estate Investing, successful investor and author Gary Eldred presents the tools and knowledge new investors need to get started. This no-hype guide presents case studies of people just like you-regular people who used these simple, smart strategies to earn big returns. You'll not only gain the basics of real estate investing, but also a vault full of specialized techniques that the pros rely on to grow their long-term wealth. Concise yet comprehensive, this practical guide shows you how to: * Find below-market deals * Invest using little or none of your own cash * Use low or no down payment seller financing * Find creative ways to finance your investments * Make money with foreclosures and REOs * Increase the value of an investment property * Negotiate a winning purchase offer * Manage rentals hassle free * Flip properties for fast profit In addition, Eldred shows you how to tailor your investment strategy to make money in any place in any type of market. With proven techniques and timeless principles, The Beginner's Guide to Real Estate Investing is the prime resource you need to start building a prosperous future-today.

    Code :
    http://ifile.it/6ozqrm

    AddThis Feed Button
    Bookmark and Share

    Monday, December 1, 2008

    How To Create A Custom Splashimage For GRUB

    Almost all the popular Linux distributions use the GNU GRand Unified Bootloader (GRUB) as the bootloader of choice these days. If you have been experimenting with a number of distributions, you must have seen that some of them have a backdrop image for GRUB and some (like Ubuntu) don’t.

    If, like me, the default black background of the GRUB menu looks boring to you or if you would like to change the default backdrop to something of your choice, like your girlfriend’s photo for example, then follow along!

    We will use:

    • An image of the photo you want to use as the background
    • GIMP
    • A text editor

    Steps

    First, open up the image you want to use as the backdrop in GIMP. There are a few things you should keep in mind while choosing a image for a task like this. You must keep in mind that when the GRUB menu is displayed, your system has limited graphic capabilities. So don’t choose an image that is too wide or too high. A normal 4:3 aspect ratio photo or image would work well.

    Also not something that we will have to reduce colors (to a mere 14 to be precise), so again don’t choose something with gradients, or soft edges or varying tones of a single color because all this will look abrupt once we finish editing to make it work with GRUB.

    Once the image is open inside GIMP, go to Image > Scale Image. In the dialog that appears, type 640 for the width, the height would automatically be reduced to 480 (if it’s set to constrain proportion and if you chose the right sized image). Once you are satisfied hit ‘Scale’. The image will now be scaled to 640 x 480, which is perfect for our needs.

    Next go to Image > Mode > Indexed. Check ‘generate optimum palette’ if it’s not already checked and key in ‘14′ in the ‘Maximum number of colors’ box. Leave color dithering to none. Hit ‘convert’ and you will see that your image loses some colors and looks a bit out of place. If it’s too much for you, maybe you should try it on a different image. It’s all about what you would like to see! If it looks good, then we are almost done.

    Click on File > Save and save the image as an xpm file. Further use gzip ~/background.xpm (assuming you saved it as background.xpm in your home directory) to create a file background.xpm.gz. You may also use File Roller to achieve the task as long as you get background.xpm.gz

    Now for the final part we need to tell GRUB to use the masterpiece you have just created as the background. Since now you know how to create the backgrounds for GRUB, you might as well create a dedicated directory to store them. Quickly type in the following set of commands:

    sudo mkdir /boot/grub/backgrounds/
    sudo mv ~/background.xpm.gz /boot/grub/backgrounds/

    Finally edit the boot menu file to let GRUB know about the location of your master piece(s). You will need to edit the /boot/menu.lst file. Do so as follows:

    sudo vi /boot/grub/menu.lst (or “gksu gedit /boot/grub/menu.lst” if you prefer GUI)

    Scroll down or find the line which reads ‘End Default Options’. Just next to this line and before the title paragraphs start you need to insert the following line

    splashimage=XXXXXX/boot/grub/backgrounds/background.xpm.gz

    replace XXXXXX with your root partition. If everything went well, you should see the background next time you boot.

    There you go, your very own personalized GRUB splashimage. You can also find ready made splashimages at gnome-look and other places.

    Let me know in the comments if you have some questions. Oh and don’t forget to show us what you are using as a splashimage for the GRUB menu on your machine.

    AddThis Feed Button
    Bookmark and Share

    Share

    Twitter Delicious Facebook Digg Stumbleupon Favorites More